Planning a Splinter Deployment
If you’re planning to configure a new Splinter node and join a Splinter network, this guide explains what you need to know before you start.
Splinter works with a wide variety of deployment patterns. This guide summarizes how to use Docker containers, a basic Kubernetes pod, and Amazon Elastic Kubernetes Services (Amazon EKS).
See Security Considerations for information about admin roles and permissions.
Overview
A Splinter deployment usually has the following items:
-
A system (called a node) that runs the Splinter daemon (splinterd) and associated components. Splinter includes a REST API for applications to communicate with splinterd.
-
A server-side application with a local database for storing persistent data, such as transaction-based changes from Splinter’s state delta export function.
-
A web UI (brower-based user interface) for interacting with the application.
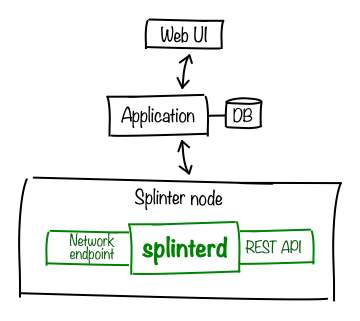
Splinter Architecture
Splinter is a privacy-focused platform for distributed applications that provides a blockchain-inspired networking environment for communication and transactions between organizations.
Splinter provides a networking layer and services for running smart contracts so that applications can build upon this functionality. A Splinter network allows both network-wide shared state and private communication between two or more participants (Splinter nodes), all managed with consensus. Splinter ensures privacy for multi-node conversations, as well as the state shared by these nodes, by using circuits and services.
-
A circuit is a virtual network within the broader Splinter network that safely and securely enforces privacy scope boundaries. Connections are dynamically constructed between nodes as circuits are created.
-
A service is an endpoint within a circuit that sends and receives private messages. All nodes on a circuit run the same set of services.
-
Shared state (a database updated by smart contracts) is visible only to the services within a circuit.
For more information, see Features and Concepts.
Network Configuration
The Splinter daemon, splinterd, communicates with other nodes on the network and provides a REST API to expose Splinter functions and data to your application. The Splinter daemon uses the following ports:
-
8044: Network endpoint for node-to-node communication
-
8080: Application communication via the splinterd REST API
If your Splinter node is behind a firewall, the node must be accessible from the internet on a well-known URL. Your firewall or ingress solution must be configured to allow inbound and outbound raw TCP traffic to port 8044. Communication over this connection is encrypted with TLS.
Note: Although you can run splinterd behind a firewall without opening up a port, it is not recommended. If splinterd cannot accept incoming connections, it will not receive circuit management requests from new peers; existing peers that have disconnected cannot reestablish their connections to your node. If running behind a firewall without an open port is absolutely necessary, see the Splinter FAQ.
We recommend redirecting web server traffic from port 80 to port 443, which sends all HTTP requests to the TLS port.
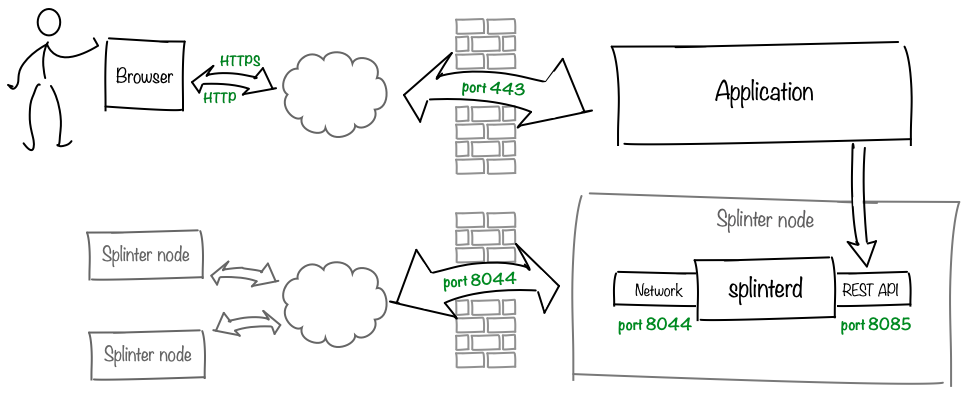
Application Pattern
Users generally access the application with web-based apps that interact with Splinter through a web server and server-side application. Splinter includes Canopy, a distributed-application UI framework that dynamically loads distributed UI components called Saplings. See Canopy Application Framework for more information.
The server-side application (application server) is commonly a single application with a REST API, as shown here, but more complex designs are possible.
A local database optionally saves Splinter data (transaction-based changes from Splinter’s state delta export function) as well as any application data that must be persisted across restarts.
Important: Splinter requires shared storage (such as a Docker volume or Kubernetes persistent volume) for
/var/lib/splinter, which contains circuit definitions and shared state.
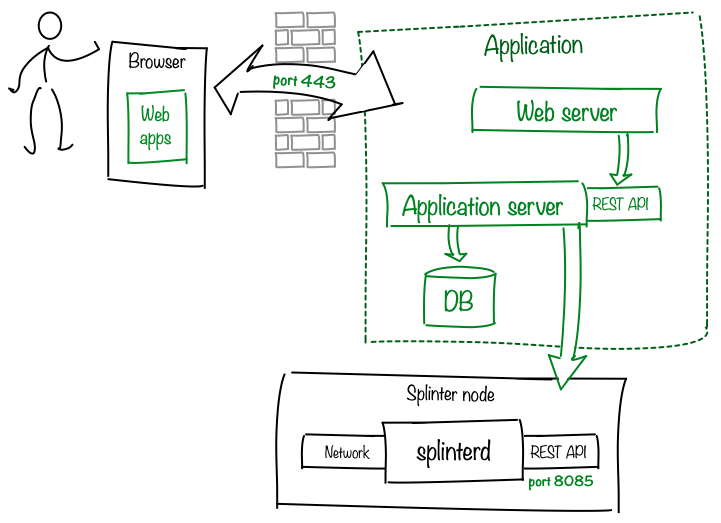
Docker Deployment
In a basic Docker deployment, each component runs in a separate Docker container. We recommend an additional container for terminal access, where you can use the Splinter command-line interface (CLI) to interact with splinterd.
-
The splinterd container requires a Docker data volume for
/var/lib/splinter. -
If your application requires persistent data across restarts, configure a Docker data volume for the database container.
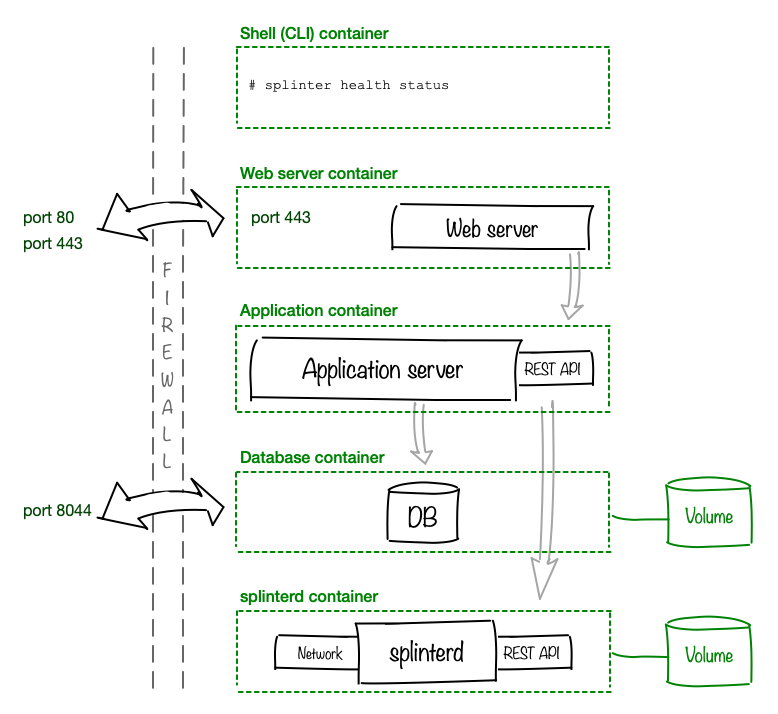
Basic Kubernetes Deployment
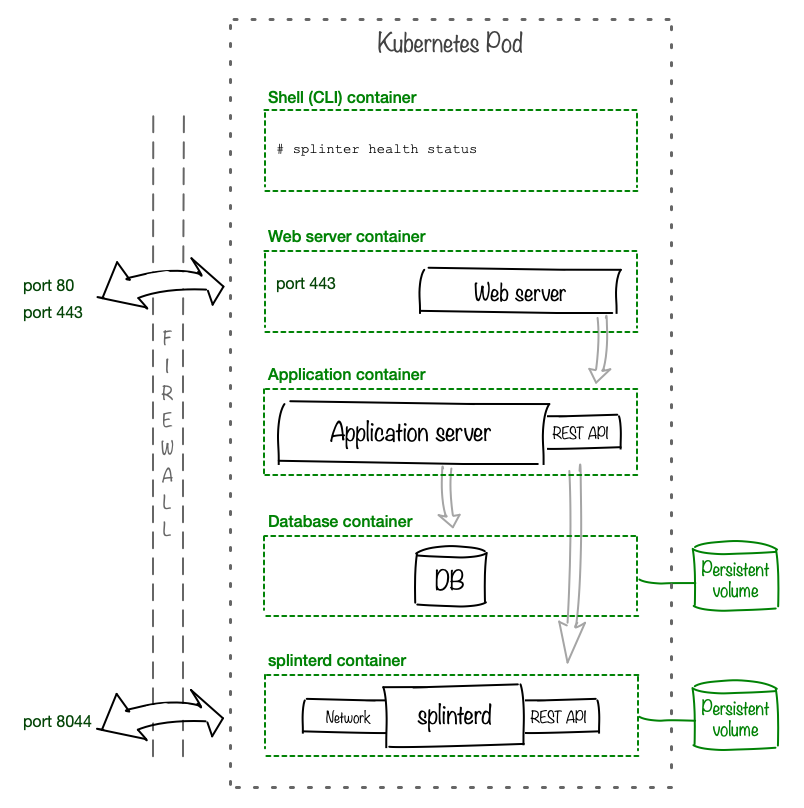
For a basic deployment of Splinter on Kubernetes, one Pod contains the containers for each component. Although many deployment patterns are possible, this pattern has been tested with the Splinter examples.
-
The splinterd container requires a persistent volume for
/var/lib/splinter. -
If your application requires persistent data across restarts, configure a persistent volume for the database container.
Amazon EKS Deployment
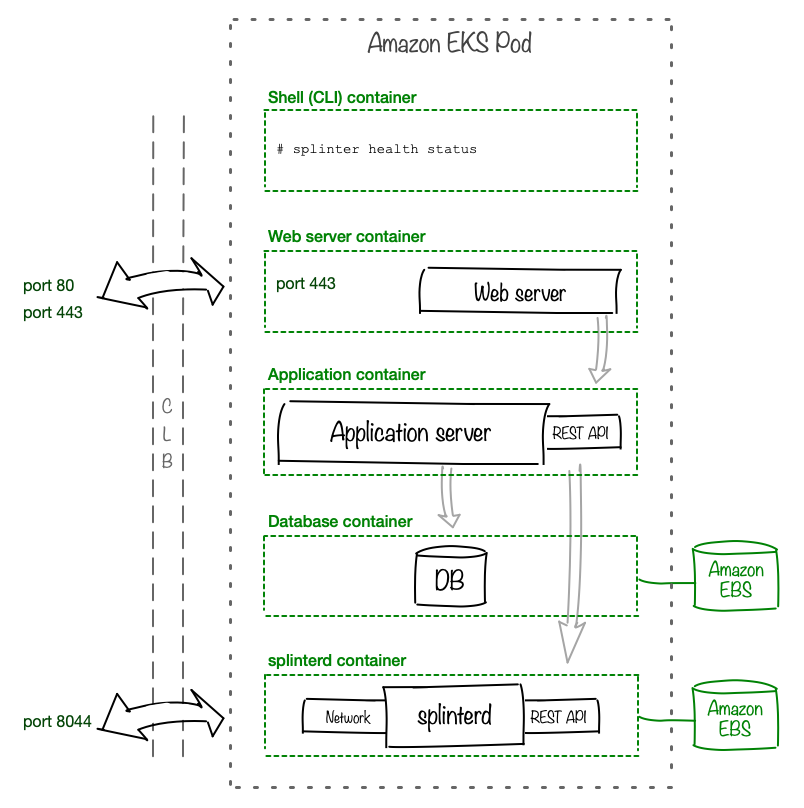
This example of Amazon EKS deployment uses a classic load balancer (CLB) as the ingress and Amazon Elastic Block Storage (EBS) as the backing store for persistent volumes. Although many deployment patterns are possible, this pattern has been tested with the Splinter examples.
-
The splinterd container requires an EBS persistent volume for
/var/lib/splinter. -
If your application requires persistent data across restarts, configure an EBS persistent volume for the database container.
Summary
This topic summarizes three basic approaches for deploying Splinter, but many other patterns are possible. You can customize a Splinter deployment for your organization, as long as you meet the networking requirements: Your node is accessible from the internet on a well-known URL using port 8044 and server-side application communication is allowed on port 8080.